As many of us prepare to be housebound for a while with the kids getting under our feet, thoughts (or panic) turn to “how are we going to entertain the kids?”. I am likely to be in exactly the same boat as I’m expecting my three year old son to be sent home from nursery any day now.
So to help you out (and me also), I’ve pulled together some really fun craft activities to do with your kids at home. Plus, if you take part and tag us in your photos on Facebook, Instagram or Twitter, you could win £25 worth of Creature Candy goodies! One lucky winner will be chosen on Friday 17th April 2020. Please use the hashtag #creaturecandy
I will also be publishing a blog later on wildlife activities to do outside with your kids, and also wildlife quizzes and a poetry competition! But for now, here are a few ideas to keep the little ones entertained:
Make A Hedgehog Mask

What you need:
A hedgehog mask template– print and cut out, including the eyes (get template here) Use card or thick paper.
An old bag to collect leaves etc.
Scissors
Sellotape
An ice lolly stick
PVA glue and glue spreader
Some old newspaper
What to do:
Go outside and collect lots of natural materials to decorate your hedgehog mask, in your collecting bag. These could be leaves, twigs, grass, little stones etc. – so nothing man-made. Do not pick mushrooms or berries as these may be poisonous! And be carefully of spiky plants and nettles!
Back indoors, carefully cut out your hedgehog mask and tape an old lolly stick to the bottom end of the mask to be the handle.
On some old newspaper empty your bag of natural materials and sort out what you will use to decorate the mask, then get gluing! Cover your whole mask with materials and once satisfied leave to dry.
Now wash your hands! Once the glue is dry you will be ready to become a hedgehog!
For more information visit the People’s Trust For Endangered Species.
Don’ forget to tag us in your photos on social media - @creaturecandy9
Make A Pine Cone Bird Feeder

Image: RSPB
What you need:
Pine or fir cones (dried out so they don't open)
Bird seed
Raisins
Peanuts
Grated cheese
Suet or lard
A mixing bowl
Scissors
String
What to do:
Make your bird mix. Allow the lard to warm up to room temperature, but don't melt it. Then cut it up into small pieces and put it in the mixing bowl.
Add the other ingredients to the bowl. Mix them together with your fingertips until the fat holds the squidgy mess together.
Now group your cones together and loop the string around the top of them. Then pack the sticky bird mix around the cones with your hands, creating a ball shape.
Put your cones in the fridge to set for an hour or so. After that, they'll be ready to hang up and are bound to bring the birds flocking.
TIP - make sure you hang the feeders near to some vegetation so birds have somewhere to quickly hide away.
For more information visit the RSPB website.
Don’t forget to tag us in your photos on social media - @creaturecandy9
Paper Roll Animals

What you need:
Scissors
Paint
Googly eyes
Glue
Paper
Pipe cleaners (for the monkey)
What to do:
For the elephant, cut out a small piece of the roll to create a gap between the elephants legs.
Use extra card or paper to cut out some ears and a trunk, allowing an extra tab to be folded over and stuck to the tube.
Paint the tube, ears and trunk grey and leave to dry.
Once dry, stick the ears and the truck onto the tube.
Stick on two googly eyes.
To finish, paint on some toes with white paint.
Leave to dry.
For other designs visit Frugal Fun For Boys & Girls website.
Don’t forget to tag us in your photos on social media - @creaturecandy9
Bat Finger Puppet
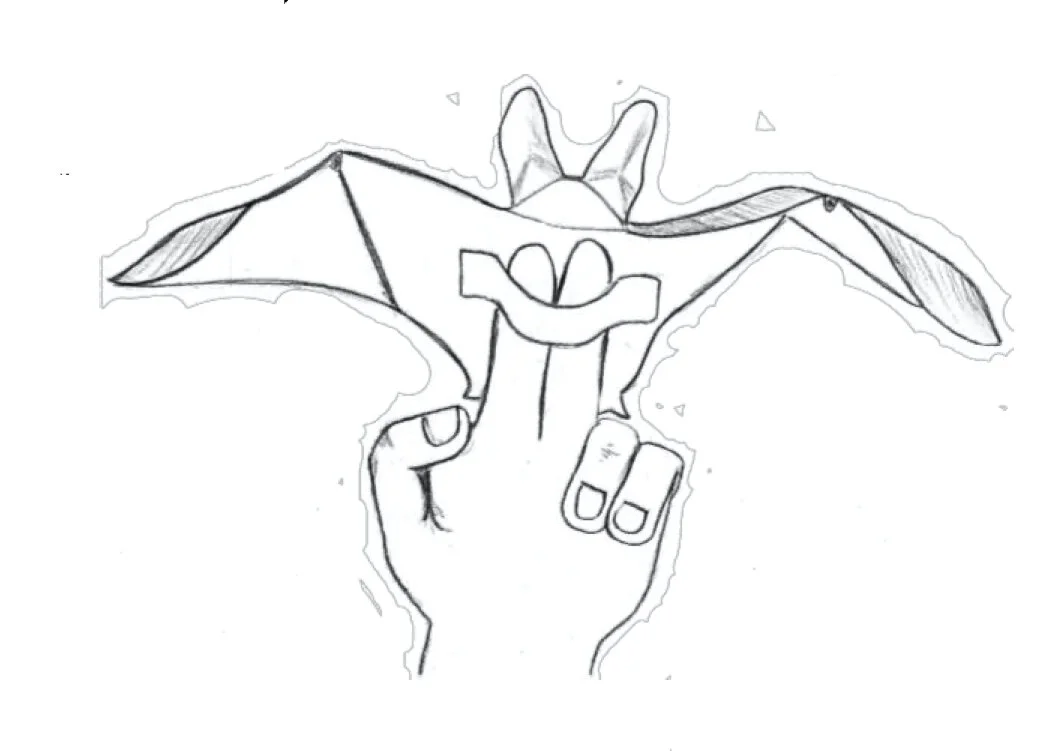
Image: Bat Conservation Trust
What you need:
Scissors
Pencil
Tape
Colouring pencils
Natural materials such as leaves and dried grass
Glue
What to do:
Download and print the finger puppet template
Cut out the bat, or use this as a template to drawn and cut one out of thick card.
Either colour in the bat or cover using natural material found in the garden, such as leaves using glue.
Leave to dry.
Affix a strip of paper about 6cm long onto the underside of your bat, leaving a loop big enough to slip one or two fingers through.
Make creases in the wings for the bat’s fingers, and bend its head and ears up slightly too.
For more information, visit the Bat Conservation Trust website.
Don’t forget to tag us in your photos on social media - @creaturecandy9
Clay Leaf Prints & Pendants

Image: artfulparent.com
What you need:
Small leaves and ferns
Air dry clay
Wax paper, parchment paper, or a plastic placemat/tray
Drinking straws
String or elastic thread
Watercolor paint (optional)
Beads (optional)
What to do:
Lay a small leaf on the wax paper, vein side up.
Pinch off a small piece of air dry clay (maybe a tablespoon or two) and roll into a ball between your hands.
Set the clay ball on the leaf, then press down with the palm of your hand to flatten it.
Carefully lift the clay disk, turn it over, and peel away the leaf.
(Optional) If you’d like to hang your leaf print, poke a hole at the top of your disk with a drinking straw.
Repeat process with additional leaves and clay balls.
Let dry thoroughly. This may take two to three days.
If desired, paint the clay leaf print with watercolors. You can also decorate them with coloured pencils.
Thread string through the hole and tie to form a loop for ornaments or a pendant. Add beads if desired. You can also string several clay disks together into a garland.
For more information visit The Artful Parent website.
Don’t forget to tag us in your photos on social media - @creaturecandy9
Make A Journey Stick

Image: growingfamily.co.uk
What is a journey stick?
A journey stick (also known as a story stick or nature stick) is essentially a memento of a nature walk, featuring items collected whilst on the walk. These might be things like leaves, twigs, flowers, feathers or anything else natural that you find along the way.
What you need:
Either a piece of cardboard with double sided tape attached to secure the items to the card,
or….
A large stick, attaching items to it using string or wool.
What to do:
Go for a walk somewhere (this could be out in your garden) and look for little pieces of nature to add to your stick. Here are some ideas of what to look for:
Feathers
Pine cone
Grass
Flowers
Shells
Leaves
Twigs
Stones
Buds
For more information, take a look at the Growing Family website.
Don’t forget to tag us in your photos on social media - @creaturecandy9
Mallard Duck Handprint

Image: craftymorning.com
What you need:
Brown paint
Paintbrush
Green/yellow feathers
Glue
Scissors
A googly eye
Green/yellow paper or card
What to do:
Start by painting your child’s hand with brown washable paint and pressing it onto a white sheet of paper.
Cut out a green duck head and beak. Glue them together and add a googly eye.
Glue on two feathers for the wings.
Add some duck legs to finish off.
IDEA - why not try creating other birds such as blackbirds and robins?
For more information visit the Crafty Morning website.
Don’t forget to tag us in your photos on social media - @creaturecandy9
Egg Carton Bunnies

Image: thebestideasforkids.com
What you need:
Egg Carton
Acrylic Paint – pink, yellow and baby blue
Scissors
Googly Eyes
Pink Pom Poms
White Foam or Card
Masking Tape
Glue
Black Marker
Mini eggs
What to do:
Begin by cutting 2 egg compartments and trimming off any excess to create a flat top to the cartons.
Place the trimmed egg cartons on top of each other with the flat tops touching. Take a piece of masking tape and put a small piece on the back of the cartons.
Then open up the egg carton and place another piece of masking tape on the inside.
Paint the egg cartons a spring colour.
Cut 2 bunny ear shapes out of the foam / card.
Once the paint has dried, add the eyes and pink pom pom for the nose with glue. Glue on the ears as well.
Take a thick black marker and add whiskers and eyelashes if desired.
Now fill with mini eggs and enjoy!
IDEA - These would be great to use for your Easter Egg hunt or as decoration on a table for your Easter dinner!
For more information visit The Best Ideas for Kids website.
Don’t forget to tag us in your photos on social media - @creaturecandy9
Bee & Ladybird Plantpots

Image: thecountrychiccottage.net
What you need:
Clay pots
Clay saucers
Acrylic paint in yellow, red, white and black
Round sponge brushes
Paintbrushes
What to do:
Paint one pot and one saucer yellow, and paint the other pot and saucer red.
Allow to dry.
For the red ladybird pot, use a white round sponge brush to add the white portion of the eyes. Then use a paintbrush to start adding the black accent down the middle as well as all the way around the bottom. Be sure to paint all the way around the bottom with the black line to give your pot a finished appearance. Then use a smaller round sponge brush to add the dots on the ladybug. Again be sure to go all the way around the pot. Once the white portion of the eyes is dry, you can add the black portion with a small round sponge brush. Then allow your entire clay pot to dry before using.
For the yellow bee pot, start with the white portion of the eye. This time use a paintbrush to paint on stripes around the body of the pot. The first line should be right under the lip of the pot. The second should be around the bottom. Then go back and split the difference between the two with a third line. Make the lines the width of your paintbrush. Finally, once the white of the eyes is dry, add a second black dot with a smaller sponge brush.
IDEA - why not try painting other animals such as tigers and pandas?
For more information visit The Country Chic Cottage website.
Don’t forget to tag us in your photos on social media - @creaturecandy9
Mini Bug Hotels

What you need:
Large plastic bottle or other waterproof container
Scissors
Natural materials to go inside
String
What you do:
Firstly, go outside and collect lots of different natural materials to fill your bug house. Some examples include: Leaves, Pinecones, Bark & Twigs, Stones, Flowers, Moss, Wood Chips, Nut Shells, Bamboo, Sticks, Grass, Shells, Twine.
Cut one side off your plastic bottle, allowing a lip at the bottom and at the top to stop materials sliding out.
Start to build up your Bug Hotel with all the items you have collected. Be inventive! Use the photo above for ideas.
Take the lid off the bottle and made a small hole in the top large enough to thread your string through to make a loop. Place the lid back on the bottle.
Hang your bug hotel somewhere outside where it will be sheltered and near to vegetation.
Remember to go and check up on it after a few weeks and see who has moved in.
For more information visit the Super Simple website.
Don’t forget to tag us in your photos on social media - @creaturecandy9
Rock Pets

Image: loveyourlittles.com
What you need:
Rocks
Paint
Paintbrushes
Googly Eyes
Glue
Clear, Protectant Spray (optional)
What to do:
Google images of the animals that you want to paint to get an idea of how to paint it. Keep it simple!
TIP - Paint the rocks white first. This will make it so the colour is more vibrant with less coats of paint.
If you make a mistake, you can typically use a wipe, and wipe it off quickly without much mess or destruction.
Once your design is finished leave to dry.
Spray a layer of protectant spray and leave to dry again (optional).
Add the googly eyes last with glue.
IDEA - why not paint several different animals, hide them in the garden and have an animal hunt with your kids?
For more information visit the Love Your Littles website.
Don’t forget to tag us in your photos on social media - @creaturecandy9
Share Your Photos On Social Media To Win!
We’d love to see your creations so social media, so please do post some photos and copy us in, and we will repost them for you. We will also choose one lucky artist to win £25 worth of Creature Candy goodies! You can choose your favourite designs and products.
Instagram - @creaturecandy9
Facebook - @creaturecandy
Twitter - @creaturecandy9
About Creature Candy
Creature Candy is a small business, with the primary aims of raising awareness of Britain’s declining wildlife and raising funds for British wildlife charities. We currently support 12 different charities including Bat Conservation Trust, British Trust for Ornithology and People’s Trust for Endangered Species.
Educating children about wildlife issues and encouraging play outside is incredibly important to us. If you have any feedback or suggestions on how we can do this, we’d love to hear your views.
Please email Lizzie - lovenature@creaturecandy.co.uk
Thank You & Take Care
And finally…….
We wish you all good heath, love and happiness in these crazy times.
xxx